| There are 5 types of region to capture: rectangle,
square, ellipse, circle and polygon. Click the menu item under Capture
menu to capture the type of region you want. For example, click "Capture >
Rectangle" menu item to capture a rectangle area from the screen. You can also set the Default / Last capture to
Window, Button, Control under the Capture tab of Capture
settings dialog, then press the hotkey or click "Capture > Default /
Last capture" menu item to start capture. When capturing, Quick
Screenshot Maker will hides itself. To view Quick Screenshot Maker after
capture, check the "Show main window" option under the Edit tab of
Capture settings dialog, if not, Quick Screenshot Maker will be
minimized (visible only on the system tray area) and you'll have to click
on it to open it up again.
If you want to include cursor, check the Include cursor image
option under the Capture tab of Capture settings dialog.
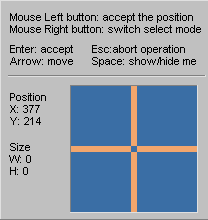
When region capture is activated, the cursor changes to a large cross
cursor. And a small reminder window appears on the screen. Hide / Show it
by using "Space" key. The window will show the mouse pointer's
coordinates, and the width and height of the smallest rectangle that
contains the shape. Also it shows the enlarged bitmap around the cursor to
help you capture exactly you want.
To capture the region, following the steps
below:
- Click using your left mouse button to indicate where you want to
start the capture area, and then release it.
- Drag the outline to enclose the area you want to capture, and click
the left mouse button again to complete the capture.
- During step 2, if you want to change the start position of the
region, just click the right mouse button. Then the shape will move with
the mouse without changing the size. Click the right mouse button again
to change the size, or click the left mouse button to complete the
capture.
Note 1: Selection of regions to be captured can be made either
with the mouse or using the direction (arrow) keys on your keyboard.
Note 2: If you are capturing a polygon region, click the left mouse
button to make new node, and you can complete the capture by the "Enter"
key.
 Download
Now... Download
Now...
|